- Once you have created your Google Adsense unit go to Design > Edit HTML
- Check the Expand Widgets Template box
- Find the code you replaced in Step 4
<b:section class='header' id='header' maxwidgets='3' showaddelement='yes> - Directly below you will see lines of code that resemble the following:
<b:widget id='AdSense2' locked='false' title='' type='AdSense'>

<b:includable id='main'>

<div class='widget-content'>

<data:adCode/>

<b:include name='quickedit'/>

</div> - Add the following code shown in red
<b:widget id='AdSense2' locked='false' title='' type='AdSense'>

<b:includable id='main'>

<div class='widget-content'>

<div align='center'><data:adCode/></div>

<b:include name='quickedit'/>

</div> - Save template and view your Adsense widget which will now be centered
how to center adsense unit in blogger
Add Google Adsense to Blogger Header
How To Add Google Adsense to the Header (Above the Title)
If you want to add Google Adsense to your header for instance above the title you can by adjusting your template to give you the option of adding more than one widget to the header area.

If you want to add Google Adsense to your header for instance above the title you can by adjusting your template to give you the option of adding more than one widget to the header area.
- Login to Blogger and navigate to Design > Edit HTML
- Back up your template as a precaution by downloading the full template to your computer
- Using CTRL + F to bring up the search box find the following line of code. For default Blogger templates - Layout (2006) such as Minima, Thisaway and Sand Dollar and for many custom templates find <div id='header-wrapper'>
For new Blogger templates such as Simple and Awesome Inc find this line <div class='region-inner header-inner'>
- Replace the following code in red:
<div id='header-wrapper'>

<b:section class='header' id='header' maxwidgets='1' showaddelement='no'>
with
<div id='header-wrapper'>

<b:section class='header' id='header' maxwidgets='3' showaddelement='yes'> - Save Template
- Navigate to Design > Page Elements (previously Layout > Page Elements) and view the new option to add a gadget to the header area

- Click on Add a Gadget and select the Google Adsense gadget.
- Choose the type of ad unit you want. For this example I chose a new linked 728x15 ad unit from the dropdown format menu for an Adsense ad that would sit above the blog title. Configure colors if necessary. Color blending is usually done automatically by Blogger according to the color schema of your template.
- Click Save
- Click View Blog to see your new Google Adsense unit in place. All going well your new ad unit should appear in blo header
Bloggers Guide to Google Adsense Myths
Google Adsense Myths Every Blogspot Bloggers Needs to Know
There are a number of myths about Google Adsense which can lead new bloggers in particular into believing that they need only slap a few Google Ad units on their blog and they will become instant millionaires. The reality can be a lot different especially when you consider that 95% of all blogs receive less than 100 visitors per day. Adding Google Adsense to your blog can generate some income but there is a need to be realistic. Here are 6 myths about Google Adsense that every blogger needs to know:
Myth 1. Google Adsense is a Get Rich Quick Scheme

False. Only a small percentage of bloggers actually make a living from their blog. It is definitely possible to make some money from Google Adsense Ad units but bear in mind that making money from your blog is commensurate with many factors such as types of advertising, placement of advertising, quality of your content, regular posting, number of articles, SEO, backlinks to your site, number of visitors to your blog to name just a few. The more articles you write, the more posts indexed in search engines like Google and Yahoo which may lead to increased traffic but not necessarily. The bottom line is that for your ads to be effective your blog needs to receive traffic so concentrate your efforts in this area and make sure that your blog is worth visiting once your visitors get there.
Do Your Sums
As Google Adsense itself says it is difficult to predict earnings however there are some general pointers to guide you. For instance if your blog receives 100 visits per day your likely revenue from Google is probably about 10 cents per day assuming that 1 in 100 people click on some form of Google advertising on your site and the page CTR is about 0.20%. Over a year that equates to about $36.50. Not a fortune in anyone's book. Likewise if your blog is fortunate enough to receive 1000 visitors per day you are looking at an annual income from Google Adsense of $365.00.
100 Visitors per day = Earnings $36.50 per year
1000 Visitors per day = Earnings $365.00 per year
5000 Visitors per day = Earnings $1825.00 per year
10000 Visitors per day = Earnings $3650.00 per year
The above figures are an optimistic view. I have not allowed for the fact that many of your visitors will be repeats so the likelihood of a repeat visitor clicking on an ad unit is less than for that of a new visitor. On this basis your earnings could be much less.
Google Adsense and Affiliate Marketing
About 95% of Bloggers would have less than 100 visitors to their blog a day. If your blog is in this category then Google Adsense alone will not allow you to quit your job and become a full-time blogger. You will need to display other forms of advertising on your blog as well before your blog will start to pay. Check out my article on other forms of advertising that may be suitable for your Blogger blog including displaying Affiliate Marketing banners.
 Affiliate marketing banners can work as a form of advertising. Consider that if 1 site visitor in 100 actually buys something worth $50.00 you will immediately earn $5.00 assuming you receive 10% of the sale as a commission. Even if only one in 500 clicks through to the merchant and buys something you will still be ahead of the revenue earned from Google ads for the same number of visitors. $5.00 from Affiliate Marketing versus 50 cents from Google Adsense. In many ways Affiliate Marketing is a more profitable marketing strategy than having heaps of Google ads on your blog. However, in my experience a good mix of both is the way to go
Myth 2. Displaying More Ads on My Blog Will Earn More Money
 False. Some bloggers mistakenly believe that placing more Google Adsense units on their blog will yield higher earnings. Sadly this isn't the case at all. By putting more Ad units on your blog you may actually reduce your earnings. There is a risk that the highest performing Ad units will shift to positions that are less frequently clicked on. For instance while the top right hand corner is a prime place for an advertising banner because it gets viewed by the most eyeballs it is also a spot that tends to get disregarded by savvy visitors who recognise it as an advertising zone and avoid it. At the same time a 336x280 Ad unit with a higher CTR is likely to display Google Ad units which pay less because the highest CTR has been transferred to the 468x60 Ad unit.
Myth 3. More Traffic Equates to Higher Google Adsense Earnings
 Not necessarily. Depending on your blog's content it might not always be possible to drive a lot of new visitors to your blog and you rely more heavily on your repeat traffic. However, due to the familiarity of the ad placement on your blog repeat visitors are less likely to click on your Ad units than new visitors. While you can expect more clicks on your ad units as traffic increases there is no guarantee that Google Adsense on your blog will deliver the kind of earnings you might expect.
Myth 4. The Ad Format of Google Adsense Ads is Not Important
False. The ad format you display on your blog is very important. You can earn more from some ad formats than others. For instance it is generally considered that the wide Google Adsense ads (336x280, 300x250 or 250x250) perform best. I like to position one of these directly above my first post.
Link units can be profitable too if strategically placed. One of the best locations for link units is in or just below your blog header as many people are used to looking there for a navigation menu. A 728x15 linked ad unit just below your horizontal navigation menu will very likely yield good results.
Myth 5. Placement of Google Adsense Ad Units Doesn't Matter
On the contrary where you place Google Adsense can be critical to earning revenue from your blog. One of the best places to position Adsense is above what's known as the fold. The fold is the top area of your blog visible to your visitors without them having to scroll down. A 336x280 ad unit in this space works well because on arrival at your blog the visitor sees what they are looking for and clicks on it. For instance if your blog is about mountain biking then Google Adsense will very likely serve up ads about cycling equipment, cycling tours etc. For the visitor seeing exactly what they are interested in on arrival is a definite bonus which may lead them to click on your Ad unit.
Myth 6. To Make Money from My Blog I Need to Add Google Adsense
False. While Google Adsense is by far the most popular Advertising Network it is not the only advertising option. There are some good alternatives like AdBrite and Chitika. Let the type of blog you have govern your decisions around which advertising mix you employ rather than just going for Google Adsense because its the easiest.
Place Google Adsense Below Post Title in Blogger
 This ad placement requires pasting the Google Adsense code directly into your Blogger template. While not difficult I have rated the skill level as intermediate as it requires parsing (conversion of the Javascript into a format readable by Blogger) of the Google Adsense code first before pasting it into your template. For the benefit of newbies and beginner Bloggers I have broken down the steps to simplify the process and make it more manageable. What follows is a detailed step by step tutorial on how to place Google Adsense below the post title in a Blogger blog including how to create a Google Adsense ad unit if you don't already have one.
Steps to Place Google Adsense Below Blogger Post Title
Follow Steps 1-11 if you don't have a Google Adsense ad unit.
IF YOU ALREADY HAVE A GOOGLE ADSENSE UNIT
1. From the Blogger Dashboard click on the Google Adsense link at the bottom of the page
2. Proceed to Adsense Setup > Get Ads or sign up for Google Adsense if not already
3. Choose Adsense for Content from the Ad Setup screen
4. Choose Ad unit or Link unit from the Adsense for Content screen. In most cases you will want an ad unit.
5. Choose the Ad Type from the dropdown menu depending on your needs. I often select text only because I think they are better performers but you may have a different experience. Click on the Continue button
6. Choose the Ad Format. Most likely this will be between 336x280, 250x250, or the 468x60 banner sizes.
7. Choose your color palette according to your blog color scheme.
Tip: I find the best way to get the colors for my ads if I am not sure is to create an Adsense unit in Blogger and transfer that color scheme to the new ad unit in Google. Alternatively you can accept the default and change the color scheme later. Changing the color scheme won't affect your ad unit code for your template.
8. Accept the default font in the meantime unless you know the font that you need. You can always check this out later by reviewing your template
9. Click on the Continue button
10. Create an Ad Channel by clicking the link add a new channel. By default Google will add this to Your Selected Channels. Click on theContinue button
11. You may need to give your ad unit a more detailed name. I recommend keeping the dimensions of the ad unit in the name as it makes the unit easily identifiable. I usually add the name of the blog to the name because I have several blogs. Save and Get Ad Code by clicking on the Submit and Get Code button.
START HERE IF YOU HAVE A GOOGLE ADSENSE AD UNIT
12. Copy the Adsense code by right clicking the mouse while it is in the code box. Choose select all and then right click again and choose copy. Make sure you get all of the code
13. Open the Ad Converter by following this link to Centricle.
14. Paste the Google Adsense code into the converter and press theConvert Ad Code button. This will parse the code so that Blogger will read the Javascript properly. Leave this window open for now as we will be returning here. Note that pasting Google Adsense code in to your Blogger template that has not been parsed will produce errors
15. Login to Blogger if not already logged in
16. Navigate to Layout > Edit HTML
17. Back up your Template (recommended) by downloading it to your computer
18. Check the Expand Widgets Template checkbox
19. Bring up Blogger Search using CTRL + F. Copy and paste the following line of code into the text box to locate the block of code in your template beginning with this line:
<b:if cond='data:post.title'>Code Block to Find
<b:if cond='data:post.title'>

<h3 class='post-title'>

<b:if cond='data:post.url'>

<a expr:href='data:post.url'></a>

<b:else/>

<data:post.title/>

</b:if>

</h3>

</b:if>
20. Return to the Ad Converter and copy the converted code by right clicking your mouse and choosing select all followed by right clicking again to copy it
21. Paste this code directly after the above code block:
<p>

<!-- Start Google Ad-->

<!-- End Google Ad-->

</p>
22. Paste your Google Adsense ad code between <!-- Start Google Ad --> and <!-- End Google Ad -->
23. Click the Save Template button
24. Take a look at your new Google Adsense ad unit in your blog by following the View Blog link.
Add Banner Adsense Above Blogger Header
One of my readers asked me how to add a Google Adsense ad unit above the header of a Blogger Blogspot blog. Rather than post a long reply I decided to write an article about it so that others looking for help to place an affiliate banner or Google Adsense banner at the top of their blog will find the solution more easily.
To set up Blogger so that ad units can be placed above the header requires the addition of a snippet of code to your Blogger Template. I have aimed this tutorial at beginners and newbies to Blogger. The tweak can be performed in less than 5 minutes.

How to Add a Google Adsense Ad Unit or an Affiliate Banner Above the Blogger Header
1. Login to Blogger if not already logged in
2. Navigate to Layout > Edit HTML
3. As a precaution back up your template by downloading the full template to your computer
4. Tick the Expand Widget Templates box
5. Using CTRL + F to bring up the search box find this line which in most templates will be directly after <body> tag
<div id='outer-wrapper'>6. Paste this block of code after this line to create a new section
<div id='topads-wrapper'>

<b:section class='topads' id='topads' preferred='yes'/>

</div>
7. Next we need to add some CSS styling to the new section. Please note that the banner will be centered by default. If you want to change the alignment for some reason you just need to change the CSS styling.
Place the following code in the head section of your template before these lines:
]]></b:skin>

</head>
/* Top Ads
----------------------------------------------- */
#topads-wrapper {
margin: 0;
padding: 0;
position: relative;
text-align: center;
width: 100%;
}
#topads {margin: 0; padding: 0;}
#topads .widget {margin: 0; padding: 5px 0;}
8. Click the Save Template button
9. Go to Layout > Page Elements
10. You will now see that you can add a gadget to a new section above your header and directly below the navbar.
How to Include an RSS Feed in Blogs at Blogger.com / Blogspot.com
Blogger.com is a popular blogging site that provides not only the storage space and bandwidth for a blog, but also a number of tools that can make a blog more effective. One important blog capability is the ability to automatically display new entries from other blogs. Also called "Really Simple Syndication," or RSS. You can add this capability easily to a Blogger.com blog.
Instructions
Things You'll Need
- An active Blogger.com account
- An active Blogger blog
- 1Log into your Blogger.com account. This will take you to your Blogger Dashboard, which is a list of all of your blogs on the site along with controls for customizing them.
- 2Select "Layout" for your desired blog. The "Layout" tab will be displayed, providing a graphical representation of your blog, including the area where blog posts appear and areas where you can add customized elements.
- 3Click on "Add a Page Element." Another window will open with a list of elements that you can add to your blog. Select "Add to Blog" underneath the "Feed" element, which opens a "Configure Feed" dialog box.
- 4Copy the RSS link URL from the external blog. Most blogs place their RSS link as either text or an RSS icon somewhere on their blog. Clicking on this link will open a Web browser page with the feed URL, often a Feedburner.com address. Select this link and copy it to the clipboard.
- 5Paste the RSS link URL into the "Feed URL" box of the Blogger "Configure Feed" dialog. Select "Continue." If you make a mistake, click "Cancel" and start again.
- 6Save your changes. After clicking on "Continue," a dialog box will open showing the title of the blog feed you are publishing, an option to select how many items you wish to display, and check boxes to show "Item dates" and "Item sources/authors." Make your selections, review how the feed will look on your blog, and select "Save Changes" when satisfied.
- 7Place your new feed. The feed you just added will show up as the top item in your list of side page elements. Left-click, hold, and drag the feed element to move it to a different slot on the side, or to the top or bottom section of your blog. When satisfied, click on "Save." Then click "Preview" to see how your new feed appears. Use "Clear Edits" to undo the changes and start over.
- 1
Blogger Tag Cloud Widget by Categories / Labels
Steps for Implementation
Step 1: Back it UpAlways make sure to back up your Blogger Template before doing anything else!
Step 2: The Labels Gadget
Step 2: The Labels Gadget
Make sure that you have the Labels Page Element installed. If you haven't already...
- Go to Layout >Page Elements .
- Click "Add a Gadget" and then add the "Labels" gadget.
Step 3: Locating the "Old Code"
- Now go to Layout >Edit HTML
- Make sure that the "Expand Widgets Template" box is unchecked.
- Now we need to search for the code that looks like this.
<b:widget id='Label1' locked='false' title='Tags' type='Label'/>
Your code may look a little different. So try using your browser's search tool to find type='Label'.
Step 4: Replacing the "Old Code" with the "New Code"
- Once you've located type='Label', remove the whole line of code that looks just like the code mentioned in part 3 of step 3.
- Replace this code that you've just deleted with the code below:
/* Distributed by John Smith at WidgetsForFree.blogspot.com */ <b:widget id='Label1' locked='false' title='Tags' type='Label'> <b:includable id='main'> <b:if cond='data:title'> <h2><data:title/></h2> </b:if> <div class='widget-content' style='text-align: justify;'> <script type='text/javascript'> /* Simple Blogger Tag Cloud Widget by Raymond May Jr. http://www.compender.com Released to the Public Domain */ //Settings / Variables var max = 150; //max css size (in percent) var min = 70; //min css size (in percent) var showCount = false; // show counts? true for yes, false for no var minCount = 1; // what is the minimum count for a tag to be shown? 1 for all //Begin code: var range = max - min; //Build label Array var labels = new Array(); <b:loop values='data:labels' var='label'> labels.push("<data:label.name/>"); </b:loop> //URLs var urls = new Array(); <b:loop values='data:labels' var='label'> urls.push("<data:label.url/>"); </b:loop> //Counts var counts = new Array(); <b:loop values='data:labels' var='label'> counts.push("<data:label.count/>"); </b:loop> //Number sort funtion (high to low) function sortNumber(a, b) { return b - a; } //Make an independant copy of counts for sorting var sorted = counts.slice(); //Find the largest tag count var most = sorted.sort(sortNumber)[0]; //Begin HTML output for (x in labels) { if(x != "peek" && x != "forEach" && counts[x] >= minCount) { //Calculate textSize var textSize = min + Math.floor((counts[x]/most) * range); //Show counts? if(showCount) { var count = "(" + counts[x] + ")"; }else{ var count = ""; } //Output document.write("<span style='font-size:" + textSize + "%'><a href='" + urls[x] + "' style='text-decoration:none;'>" + labels[x] + count + "</a></span> " ); } } </script> <br/> <span style="font-size:80%;float:right;">Powered by <a href="http://www.widgetsforfree.blogspot.com">Blogger Widgets</a></span> </div> </b:includable> </b:widget>
Step 5: Previewing the New Tag Cloud
Before saving the template make sure to click preview. The new tag cloud should now be visible. If not, make sure that you've completed all the steps correctly.
Add Google Buzz Share Button - Widget for Blogger
Add Google Buzz it Button to Blogger

- Go to Layout >Edit HTML in your Blogger Dashboard.
- Back up your existing Template before making any changes!
- Make sure to check the "Expand Widget Templates" box.
- Here is the Google Buzz it Code:
<div style="float:right;padding:4px;">
<a expr:href='"http://www.google.com/reader/link?url=" + data:post.url + "&title=" + data:post.title + "&srcTitle=" + data:blog.title+ "&srcURL=" + data:blog.homepageUrl ' rel='nofolloW' style='text-decoration:none;' target='_blank'>
<img alt='Buzz It' src='http://i48.tinypic.com/idyc04.png' style='border:0px;'/></a>
</div> - Search for this line of code in your template:
<div class='post-header-line-1'/>
and place the Google Buzz it Code right after the code you searched for above.
If this doesn't work, then search for this code below and place the Google Buzz it Code directlybefore it.
<data:post.body/>
- Now save your template and you're done!
Add Google Buzz Button with Share Count to Blogger

- Here is the Google Buzz it with Share Count Code
<div style="float:right;padding:4px;"> <script type='text/javascript'> njuice_buzz_url = '<data:post.title/>'; njuice_buzz_title = '<data:post.url/>'; njuice_buzz_share = 'reader'; </script> <script type='text/javascript' src='http://button.njuice.com/buzz.js'/> </div>
- Place the Google Buzz it with Share Count Code either
directly after this:
<div class='post-header-line-1'/>
OR
directly before this:
<data:post.body/>
- To change the style of the widget add either
njuice_buzz_size = 'small';
or
njuice_buzz_size = 'simple';
just after
njuice_buzz_share = 'reader';
- Save your blogger template and you're done!
Blogger Post Image Borders Change or Remove
How to Delete, Remove, Get Rid of the Image Border in Blogger Posts
The following instructions will remove the little border around the images in your Blogger posts.
How to Change the Color of the Image Border Around Posts in a Blogger Template
The following instructions will show you how to change the color of the border which appears around images in your Blogger posts
The following instructions will remove the little border around the images in your Blogger posts.
- Login into Blogger if not already logged in
- From the Dashboard navigate to your blog. Go to Design > Edit HTML by clicking on the Design tab and then choosing the Edit HTML link
- Back up your existing Blogger template by clicking on theDownload Full Template button
- Find the following code in your Blogger template (no need to check the Expand Widgets Template box as we are only working with the CSS Style Sheet). Note: the code in Blogger templates varies but this is the code you will find on a Blogger Minima template and most other default Blogger templates.
.post img {
padding:4px;
border:1px solid $bordercolor;
}
If you do not have this code look for the following:
img{
padding: 4px;
border:1px solid $bordercolor;
} - There are two ways to get rid of the unwanted border image code. You can either:
- Remove the following line:
border:1px solid $bordercolor;
or
- Change it to the following
border:0px;
- Remove the following line:
- Click on the Save Template button
- Click View Blog to admire your post images minus any image border.
How to Change the Color of the Image Border Around Posts in a Blogger Template
The following instructions will show you how to change the color of the border which appears around images in your Blogger posts
- Follow Steps 1 to 4 as per removing the image border from Blogger posts.
- There are several methods to change the color of the image border but the easiest is to
- Change the following line:
border:1px solid $bordercolor;
to
border:1px solid #6698FF;
The above change will make the border line color sky blue. To change the color (in red) to your own color choice replace with the hex color code for your chosen color
- Change the following line:
- Click the Save Template button to save your changes
- Click on View Blog to admire the new color around the images in your Blogger posts
How to Align and Justify Blogger Posts
How to Justify Blogger Posts (Blogspot Posts) Using CSS
It is easy to change the text alignment of your Blogger posts with the addition of one extra line in the CSS styling section of your Blogger template (Blogspot template). By default the alignment is set to left align so that the text aligns to the left while the right edge is ragged. You can also have right alignment where the text aligns to the right and the left edge is ragged.
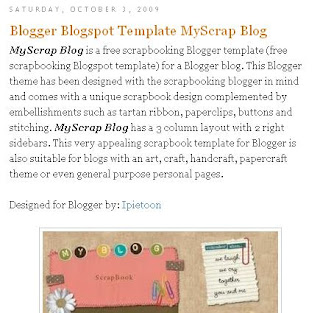
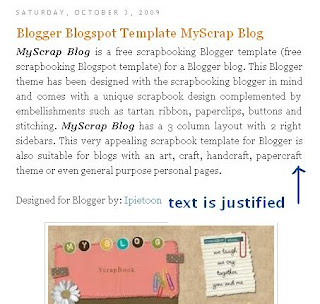
Another not so common option is to justify the text so that both left and right edges are straight. Users of MS Word and other word processing programs will be familiar with justify as an alignment choice. Justify stretches out the text so that each line has an equal width similar to what you will find in newspapers and magazines. I have found justifying my Blogger posts to be a useful feature on several of my blogs and thought some of you might to. Below are instructions on how to justify your Blogger posts so that all your blog's articles are justified but first take a look at the difference in presentation of these 2 blog posts just by justifying the alignment of the text. Makes a big difference don't you think?
It is easy to change the text alignment of your Blogger posts with the addition of one extra line in the CSS styling section of your Blogger template (Blogspot template). By default the alignment is set to left align so that the text aligns to the left while the right edge is ragged. You can also have right alignment where the text aligns to the right and the left edge is ragged.
Another not so common option is to justify the text so that both left and right edges are straight. Users of MS Word and other word processing programs will be familiar with justify as an alignment choice. Justify stretches out the text so that each line has an equal width similar to what you will find in newspapers and magazines. I have found justifying my Blogger posts to be a useful feature on several of my blogs and thought some of you might to. Below are instructions on how to justify your Blogger posts so that all your blog's articles are justified but first take a look at the difference in presentation of these 2 blog posts just by justifying the alignment of the text. Makes a big difference don't you think?


- Before you start check how text is currently aligned on your Blogger posts. If it is left aligned you will be able to follow this trick to justify it. If it is already justified no need to go any further.
- Login to Blogger if not already logged in
- From the Dashboard click the Layout link for your blog and then click on Edit HTML
- Back up your template by downloading it in full as a precaution
- Use CTRL + F to find the code block beginning with .post in the CSS styling section of your Blogger template. As templates will differ greatly there are no hard and fast rules about what styling will be in this block. Here is a typical code block taken from the default Minima Blogger template
.post {
margin:.5em 0 1.5em;
border-bottom:1px dotted $bordercolor;
padding-bottom:1.5em;
} - Add the following line to the code block before the end brace (the end curly bracket)
text-align:justify;
so that your code now looks like:
.post {
margin:.5em 0 1.5em;
border-bottom:1px dotted $bordercolor;
padding-bottom:1.5em;
text-align:justify;
} - Click on Save Template
- Click View Blog to see the alignment of all your posts has now changed to justified
Subscribe to:
Comments (Atom)